
Choose Your Device
Samsung Galaxy Book Go 5G
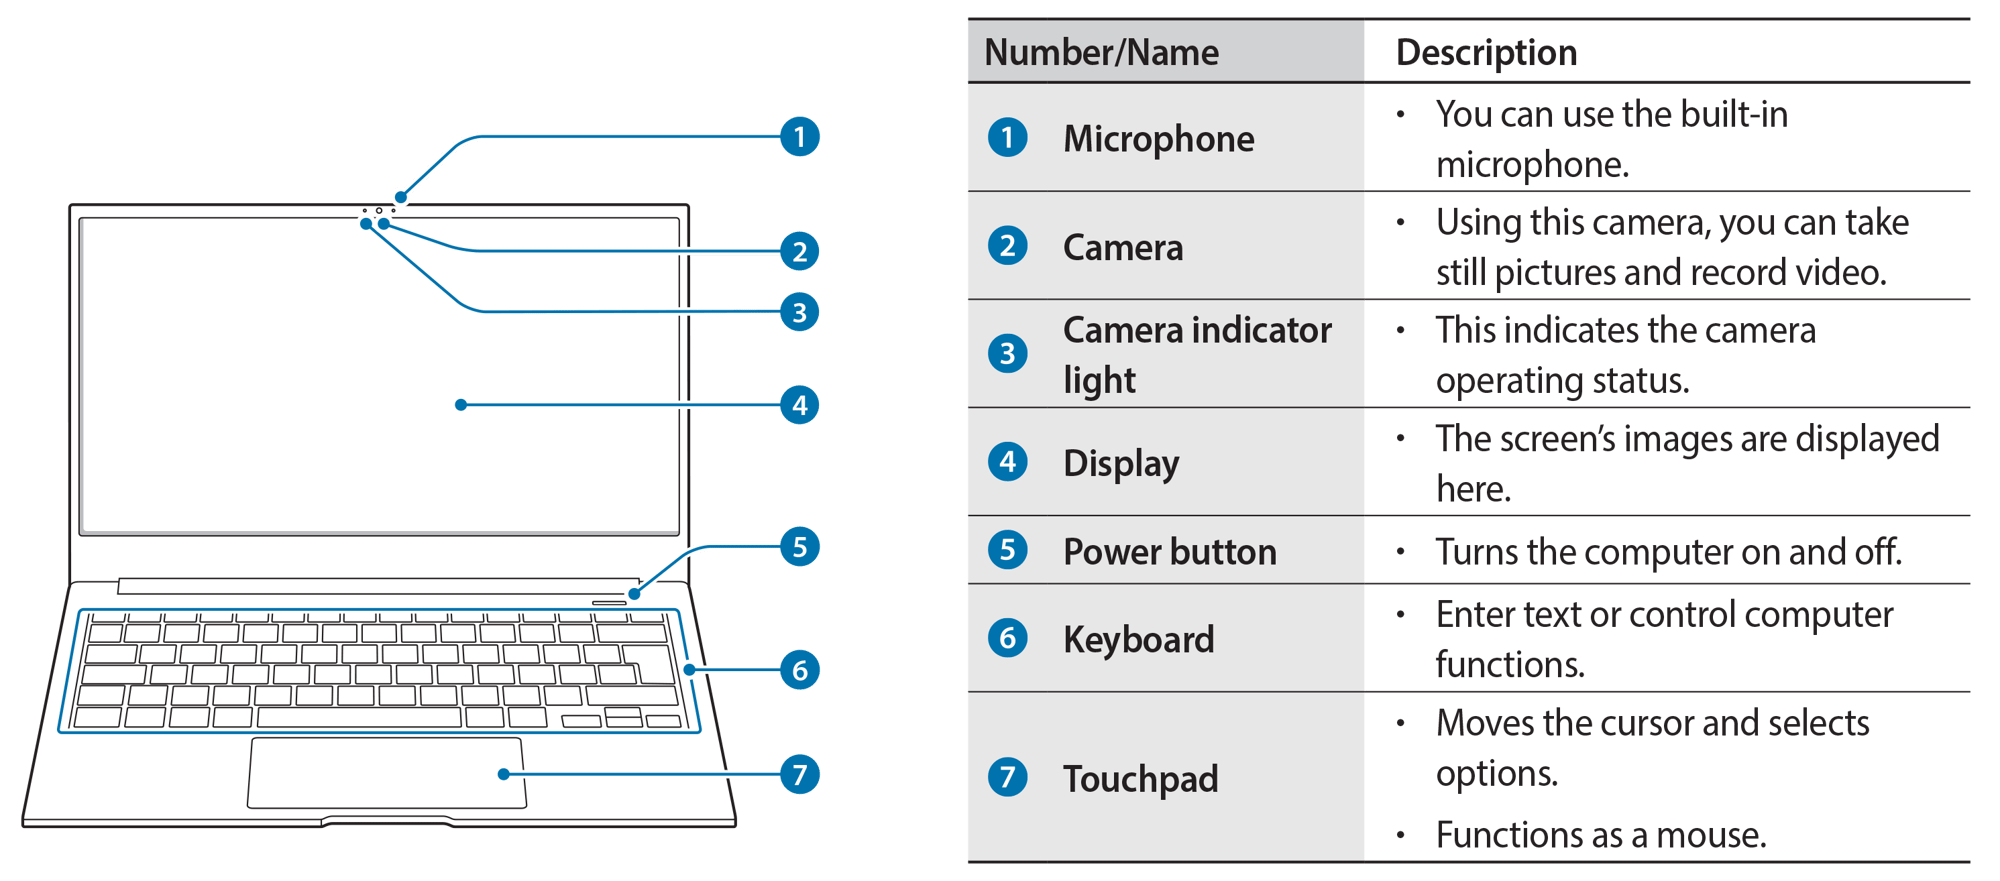
Front Side
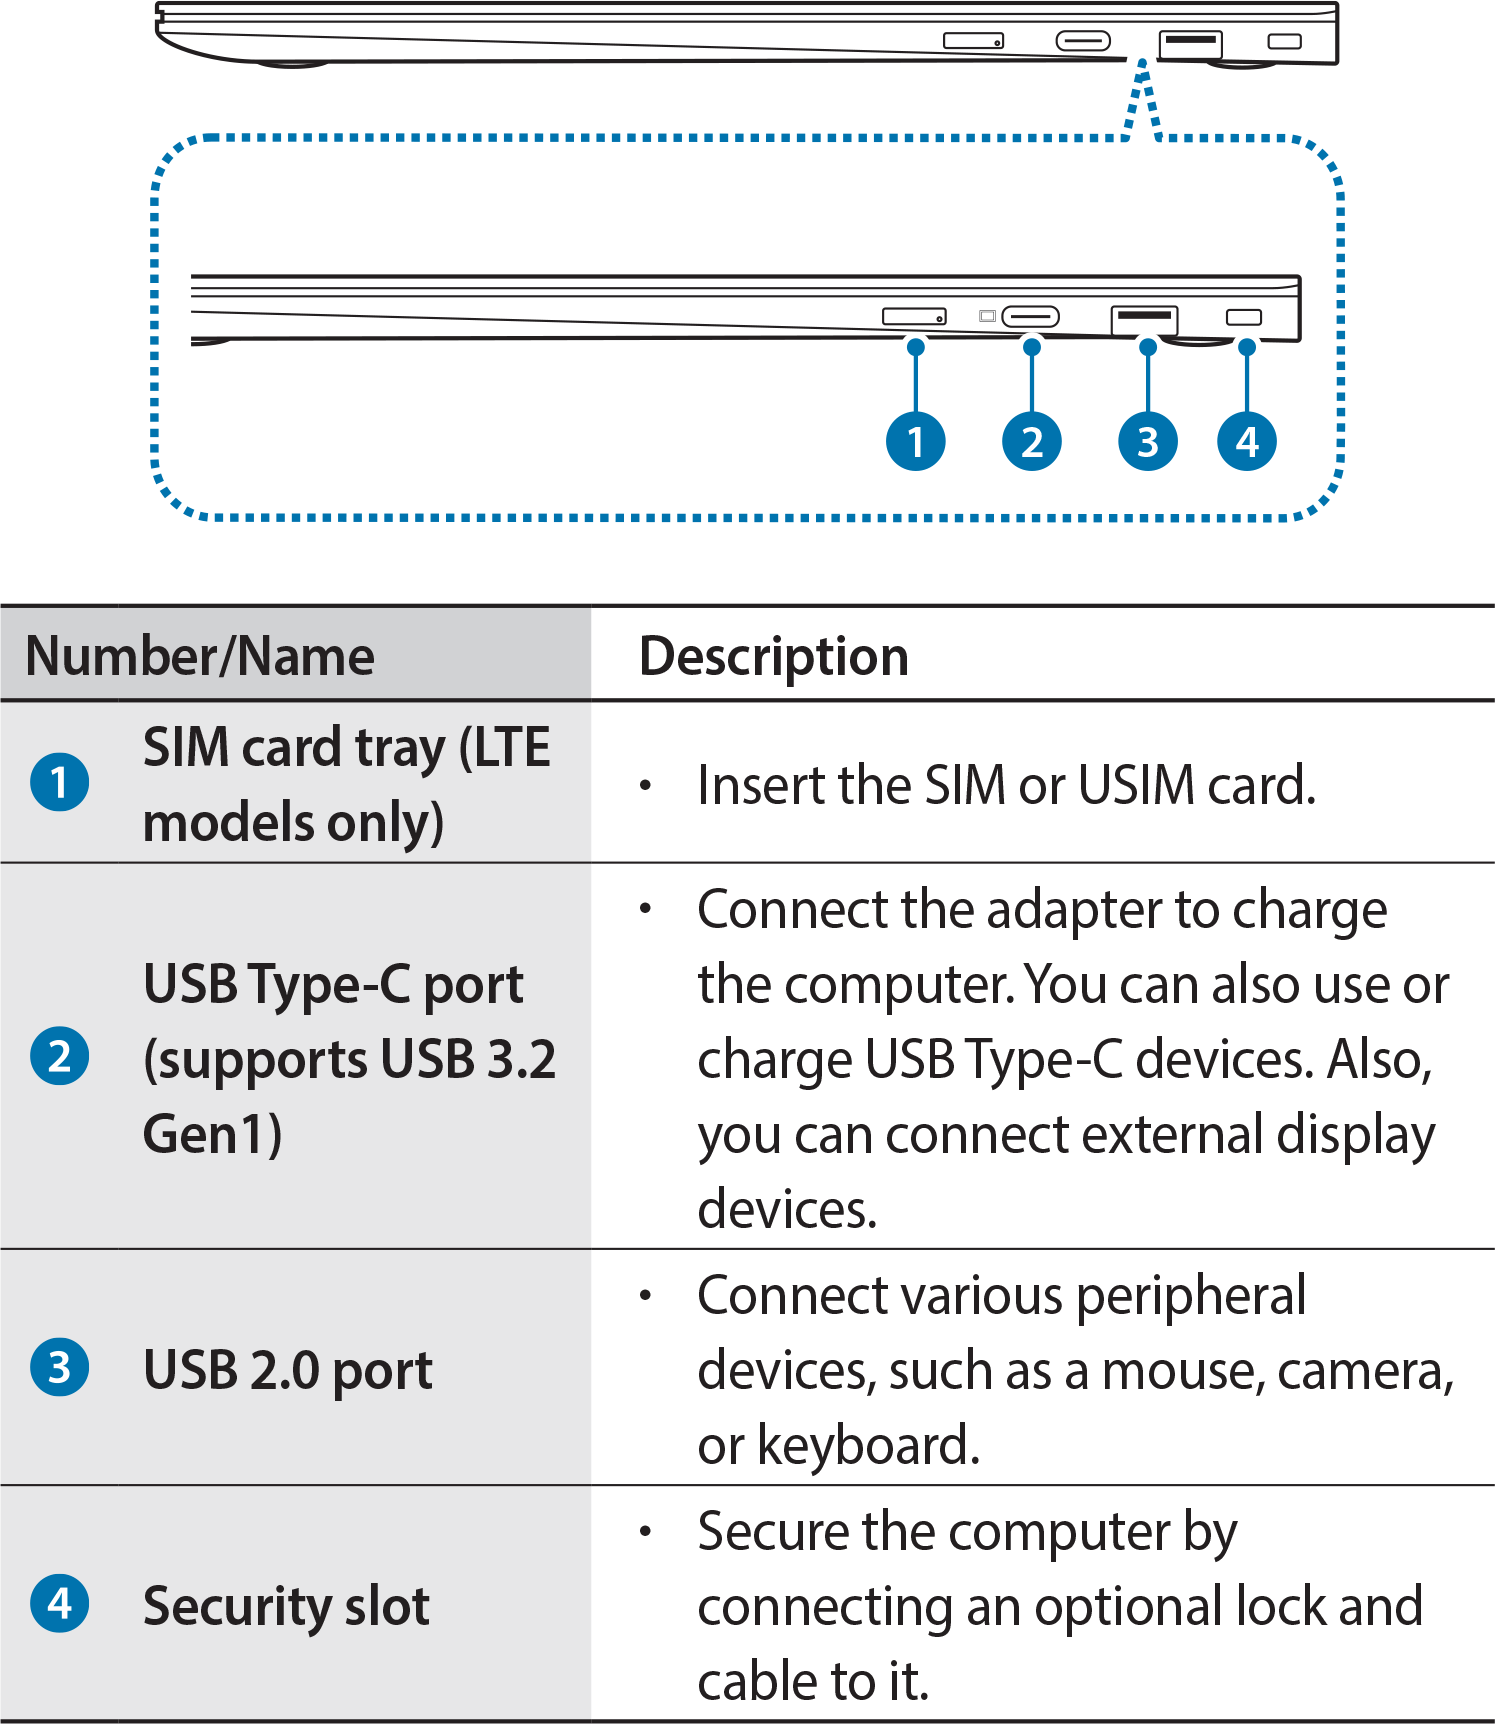
Right Side
Battery, Memory & Storage
Battery
This is a uni-body device with an internal battery that cannot be removed. If you need to soft reset the device, follow these steps:
- Tap the Start button on the bottom bar (far left icon).
- Tap the Power button.
- Tap Restart to Soft reset the laptop. Tap Shut down to Hard reset the laptop.
- If doing a Hard reset, wait 3 -5 seconds, next press the Power button on the device keyboard to turn your device back on.
SD Card
- Insert a memory card into the memory card slot in the indicated direction until it clicks.
- To remove, push the memory card, it clicks and disengages from the memory card slot.
SIM Card
This device supports a Nano size SIM card.
- Insert the ejection pin into the hole on the tray to loosen the tray.
- Ensure the ejection pin is perpendicular to the hole. Otherwise, the device may be damaged.
- Pull out the tray gently from the tray slot.
- Place the SIM card on the tray with the gold-colored contacts facing downwards.
- Gently press the SIM card into the tray to secure it and insert the tray back into the tray slot.
Settings & Tech Specs
Getting Started
When you first turn on your new device, you may see a setup wizard to help you get started. Take a look at the steps below to walk through the setup process if needed.
- Insert your active T-Mobile SIM card and fully charge the device.
- Press the power button to turn on the device.
- A 'Hello' screen will appear, select your language, select Yes.
- Select your Country or Region and select Yes.
- Select the right keyboard layout and select Yes.
- You may add a second keyboard layout, select Add layout or Skip.
- Select your Wi-Fi network, enter your network password if needed, tap Next. After your laptop connects, select Next.
- Review Microsoft Software License Terms, select Accept.
- Login or create your Microsoft account, select Next.
- Add the name, password and security questions for this laptop.
- Choose the privacy settings for your device, select Next then select Accept when finished.
- Location (On / Off)
- Find my device (On / Off)
- Diagnostic data (On / Off)
- Inking & typing (On / Off)
- Tailored experiences (On / Off)
- Advertising ID (On / Off)
- The laptop will take a few minutes to setup.
Tech Specs
- Usage time: Up to 18 hours
- Battery size/type: 5480 mAh
- AC Adapter: 25 Watt
- 720p HD camera
- 14.0" FHD (1920 x 1080)
- 12.75" (Length) x 8.85" (Width) x 0.61" (Height)
- Weight 3.24 lbs
- Color: Silver
- Storage: 128 GB ROM
- System Memory: 8 GB RAM
- External Memory: Up to 1 TB
- Windows 11
- Qualcomm Snapdragon 8cx Gen 2 5G compute platform
- Qualcomm Adreno GPU
- Stereo speakers (1.5 W x 2)
- Headset out/Mic-in combo
- Yes
- No
- No
- Nano
- No
- No
Connections & Network
Browser
Clear cache / cookies / history
- Select the Microsoft Edge browser icon.
- Select the Menu icon > Settings > Privacy, search, and services.
- Go to Clear browsing data. Then tap Choose what to clear. Make sure the following are checked.
- Browsing history
- Download history
- Cookies and other site data
- Cached images and files
- Select Clear now.
Open / close tabs / windows
- From any web page, select the Menu icon.
- Select New tab.
Turn on / off JavaScript
- Select the Microsoft Edge browser icon.
- Select the Menu icon > Settings > Cookie and site permissions.
- Select JavaScript and select one of the following.
- Allowed (recommended) (On/Off)
Network & APN
- Select the Time > Settings in the bottom right-hand corner of your screen.
- In the Network section, select Mobile Data. This option is only available if a SIM card is inserted.
- Select the T-Mobile APN if one is available. If not, select a new APN.
- Verify and update the following settings for the Data APN if needed.
- Name: T-Mobile
- APN: Fast.t-mobile.com
- Proxy: <Not set>
- Port: <Not set>
- Username: <Not set>
- Password: <Not set>
- Server: <Not set>
- MMSC: http://mms.msg.eng.t-mobile.com/mms/wapenc
- MMS proxy: <Not set>
- MMS port: <Not set>
- MMS protocol: WAP 2.0
- MCC: 310
- MNC: 260
- Authentication Type: <Not set>
- APN Type: default,supl,mms
- APN Protocol: IPv4/IPv6
- APN roaming protocol: IPv4/IPv6 or IPv4 only when roaming internationally
- Turn APN on/off: Grayed out unless there are multiple APNs
- Bearer: Unspecified
Manual Network Selection
The device detects and registers on wireless networks inside T-Mobile’s calling area, but roaming networks are usually restricted to T-Mobile SIM cards. You can manually select a network only in areas where T-Mobile does not own GSM spectrum.
- Select the Time > Settings in the bottom right-hand corner of your screen.
- In the Network section, select Mobile Data. This option is only available if a SIM card is inserted.
- Turn on Allow mobile data roaming.
- Select a Network.
Turn On/Off Data Roaming
- Select the Time > Settings in the bottom right-hand corner of your screen.
- Under Network, confirm Mobile data is turned on. This option is only available if a SIM card is inserted.
- Select Mobile data.
- Turn on/off Allow mobile data roaming.
Turn On/Off Mobile Data
- Select the Time in the bottom right-hand corner of your screen.
- Select your Network.
- Turn on/off Mobile data. This option is only available if a SIM card is inserted.
Wi-Fi Settings
Delete/Forget Network
- Select the Time > All Settings (cog wheel) in the bottom right-hand corner of your screen.
- In the Network & internet section, select Wi-Fi.
- Select the Wi-Fi switch to turn it on.
- Select the desired network, then select Disconnect.
Scan & Connect
- Select the Time > All Settings (cog wheel) in the bottom right-hand corner of your screen.
- In the Network & internet section, select Wi-Fi.
- Select the Wi-Fi switch on, if necessary.
- Select Show available networks then select the desired Wi-Fi network, enter the password if prompted, then Connect.
Turn On/Off
- Select the Time > All Settings (cog wheel) in the bottom right-hand corner of your screen.
- In the Network & internet section, select Wi-Fi.
- Select the Wi-Fi switch to turn it on or off.
Software Updates & Backup
Device Resets
Master Reset from Settings Menu
A master reset removes all user accounts and resets your Samsung Galaxy Chromebook Go to factory settings and may delete your personal data on the internal storage, such as downloads, images, and apps. It doesn't delete data stored on the SIM card or SD card.
- Back up data on the internal memory.
- Select the Time > Settings in the bottom right-hand corner of your screen.
- Select Advanced > Reset settings.
- In the Powerwash section, select Reset.
- Read and check the Powerwash disclaimer, select Continue > Restart.
- Wait for the device to reset.
Soft Reset with Hardware Keys
A soft reset is a simulated battery removal. Use a soft reset to power a device off when the screen is frozen or unresponsive and the device has an internal battery that can't be removed. It doesn't cause loss of personal data on the device.
- Press and hold the Power button for at least 8 seconds.
- Wait 3 -5 seconds, next press the Power button on the device keyboard to turn your device back on.
Software Updates
- Select the Time > All Settings (cog wheel) in the bottom right-hand corner of your screen.
- Select Windows Update.
- Wait for the device to check for updates, and download if a new software version is available.
How do I use Teams with my Chromebook?
Click the link below for step-by-step instructions:
Do I need Gmail to use my Chromebook?
No, you can use your Chromebook without a Google Account. However, in order to access some of the features and services, you need to log in with a Google Account.
To use it without logging into a Google Account you can click the “Browse as Guest” option in the lower left-hand portion of the screen when you first boot up. When using the Chromebook as a guest, you will not have access to user information, settings, bookmarks, and other features that require signing in.
To access these features, you have the option of setting up your Chromebook with your personal Gmail account or creating a new one during the initial log-in process.
Data Issues
Call T-Mobile Support (844) 341-4834
Hardware Issues
Contact its.resources@wichita.edu or call (316) 978-3616
General IT-Related Issues
Visit Wichita.edu/helpdesk
Dell Latitude 3440/3540
Front
Top
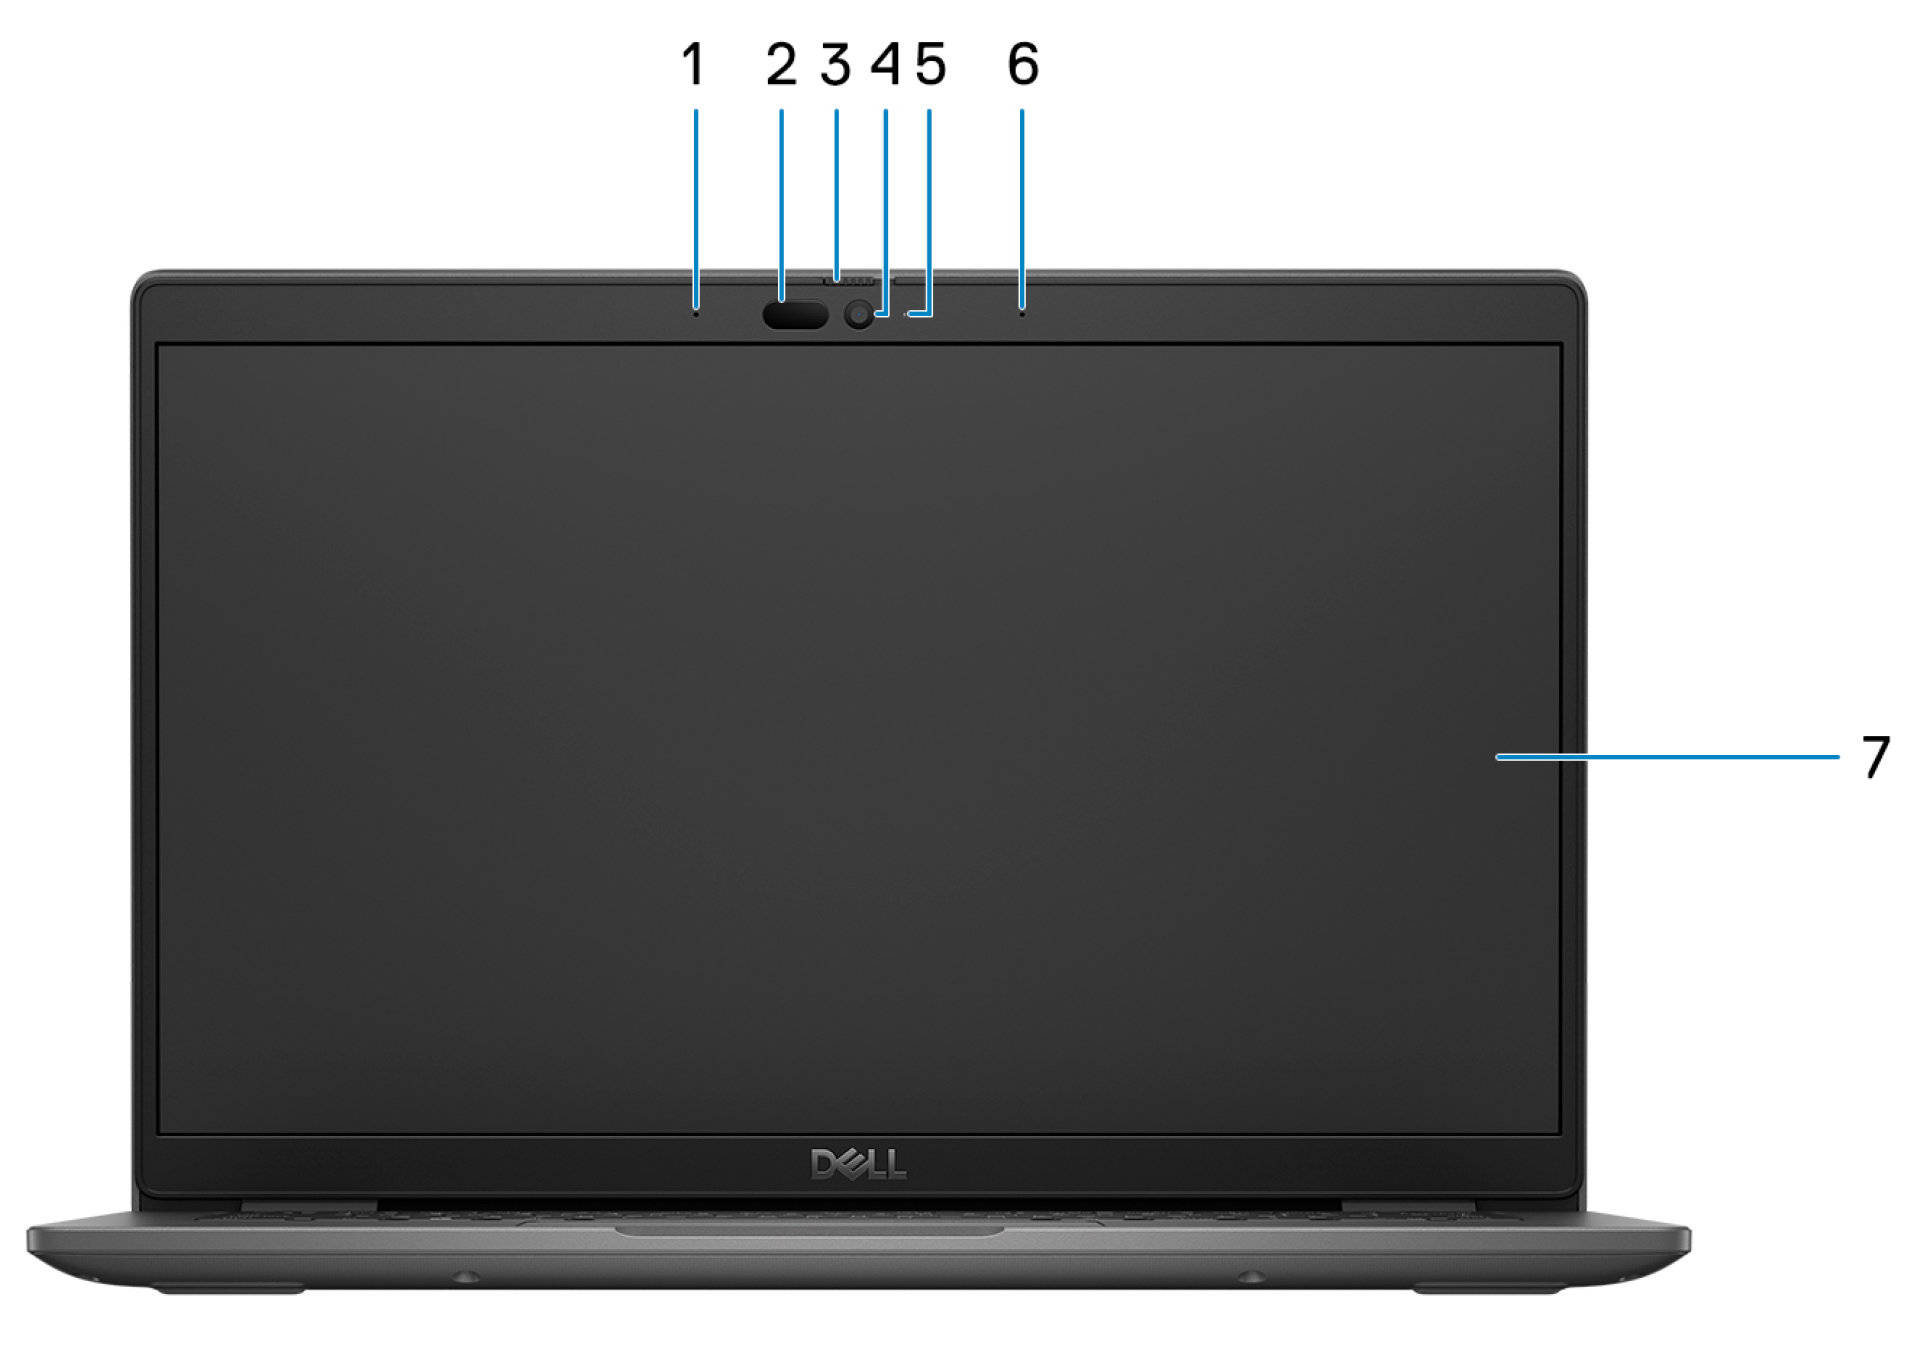
- Digital-array microphone
- IR camera and emitter (optional)
- Camera shutter
- RGB camera (HD/FHD)
- Camera status LED
- Digital-array microphone
- LCD panel
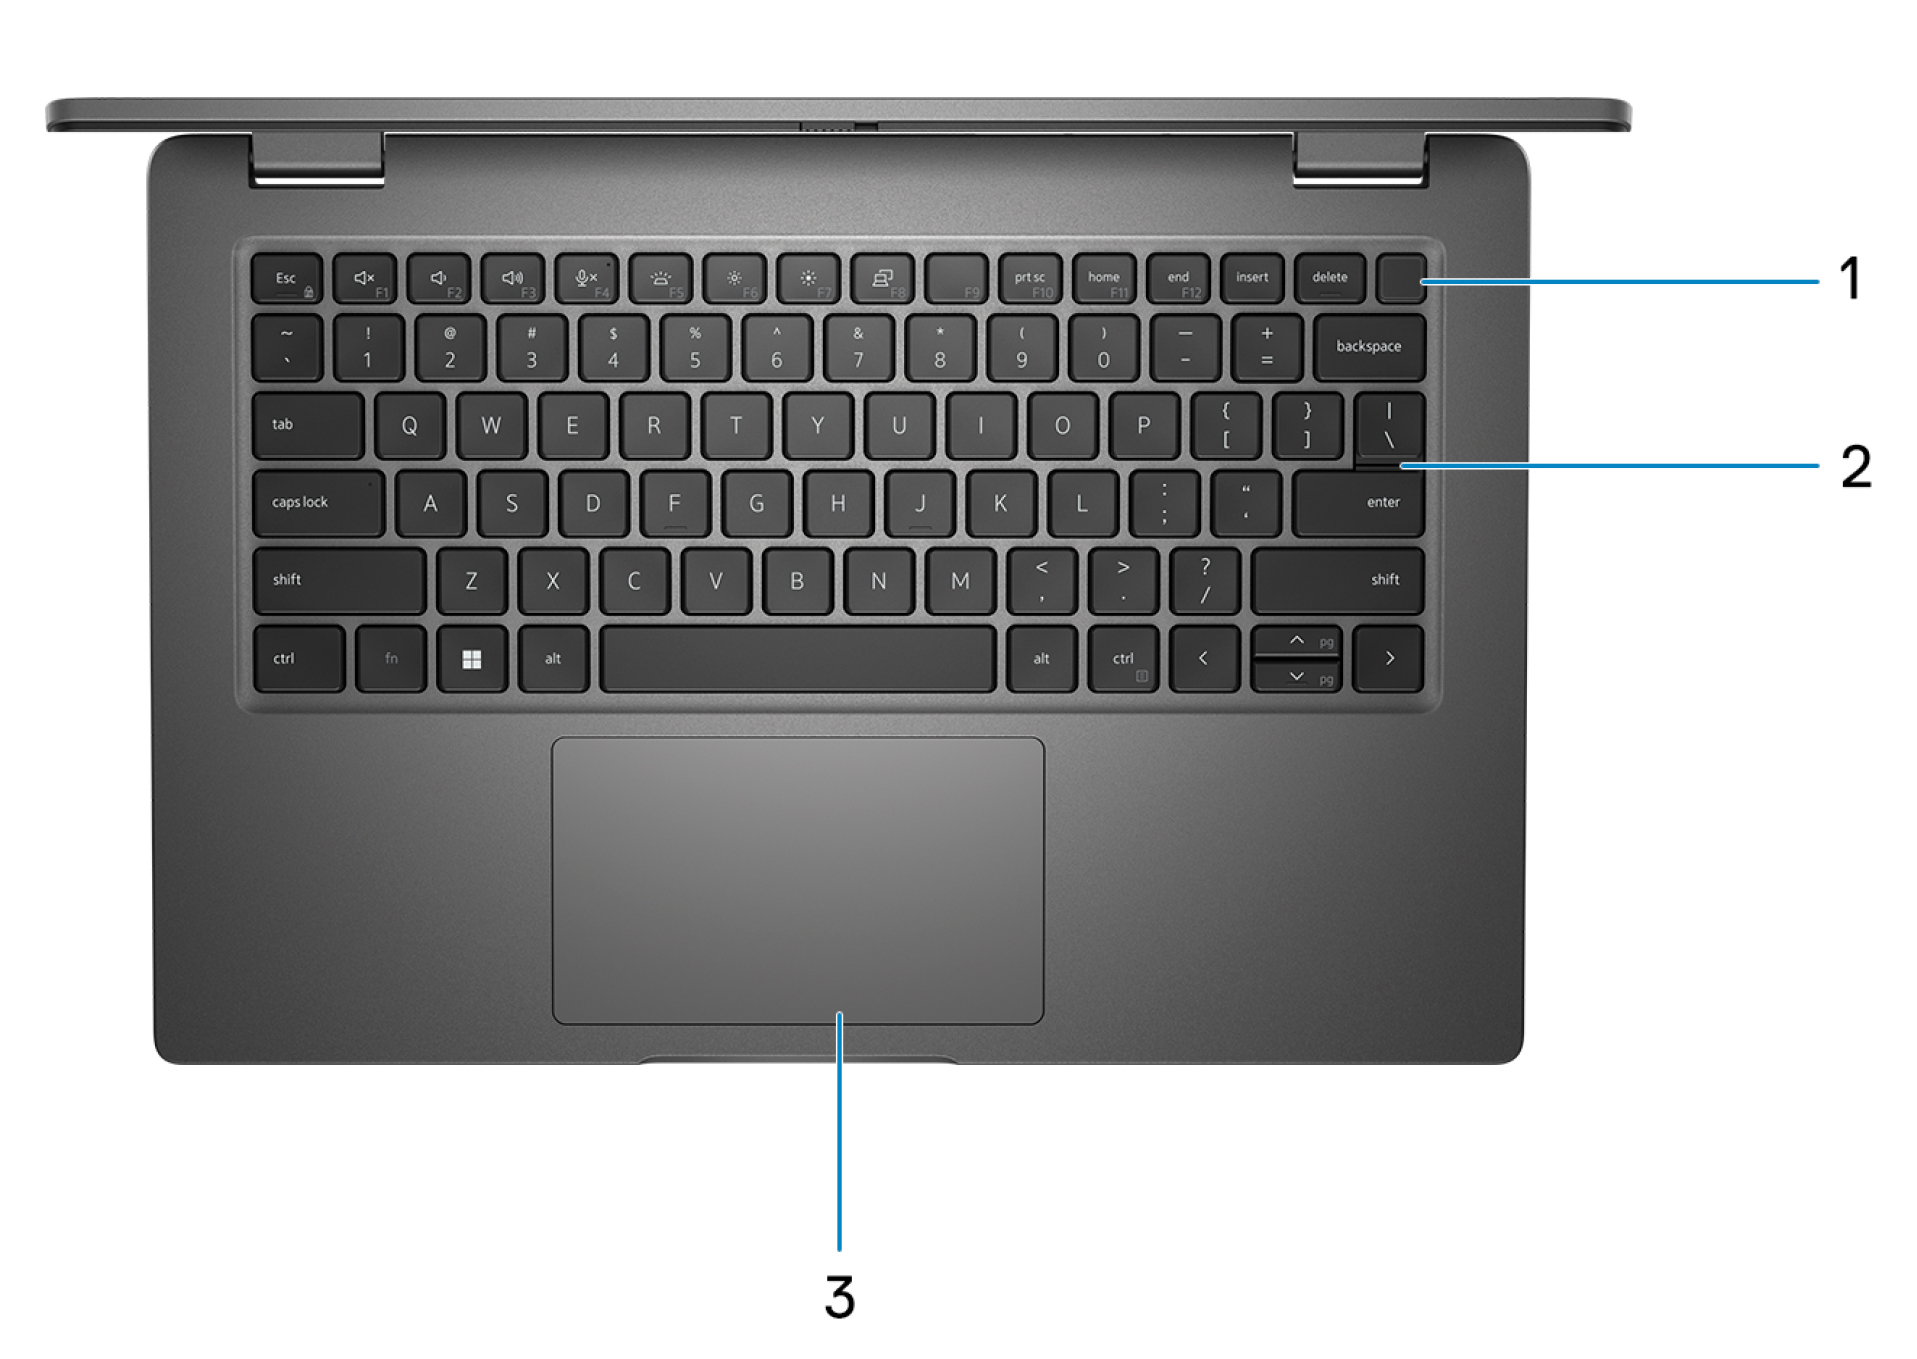
- Power button with optional fingerprint reader
- Keyboard
- Touchpad
Left
Right

- DC-in port
- Battery-status light/Diagnostic-status light
- HDMI 1.4 port
- USB 3.2 Gen 1 port with PowerShare
- USB 3.2 Gen 2 Type-C port with Power Delivery and DisplayPort Alt mode
- Universal audio port

- microSIM card slot (optional)
- USB 3.2 Gen 1 port
- RJ-45 Ethernet port
- Ethernet status LED
- Wedge-shaped lock slot
Data Issues
Call T-Mobile Support (844) 341-4834
Hardware Issues
Contact its.resources@wichita.edu or call (316) 978-3616
General IT-Related Issues
Visit Wichita.edu/helpdesk
Front
Top
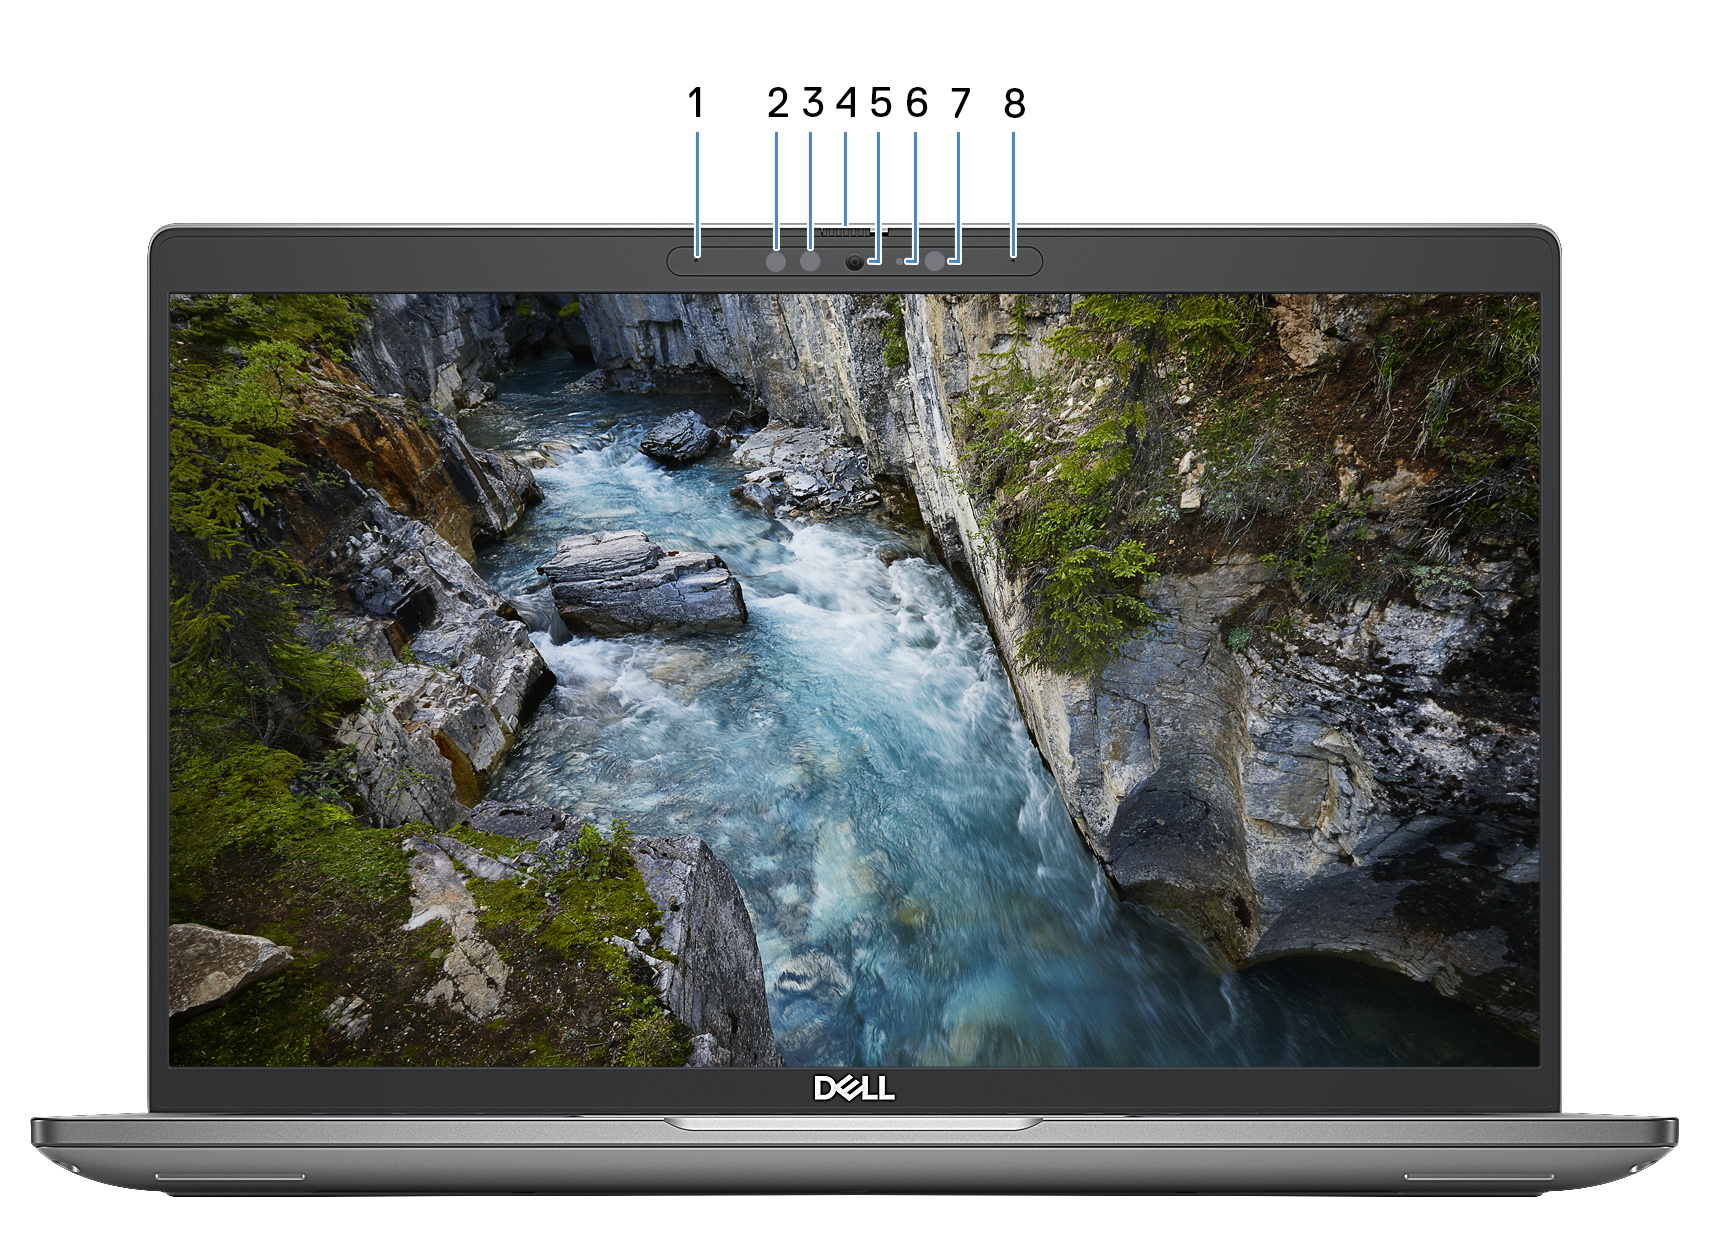
- Left microphone
Provides digital sound input for audio recording and voice calls. - Infrared emitter (optional)
Emits infrared light, which enables the infrared camera to sense and track motion. - Infrared camera (optional)
Enhances security when paired with Windows Hello face authentication. - Camera shutter
Slide the privacy shutter to the left to access the camera lens. - Camera
Make video calls, capture photos, or record videos. - Camera-status light
Turns on when the camera is in use. - Ambient-light sensor
The sensor detects the ambient light and automatically adjusts the display brightness. - Right microphone
Provides digital sound input for audio recording and voice calls.
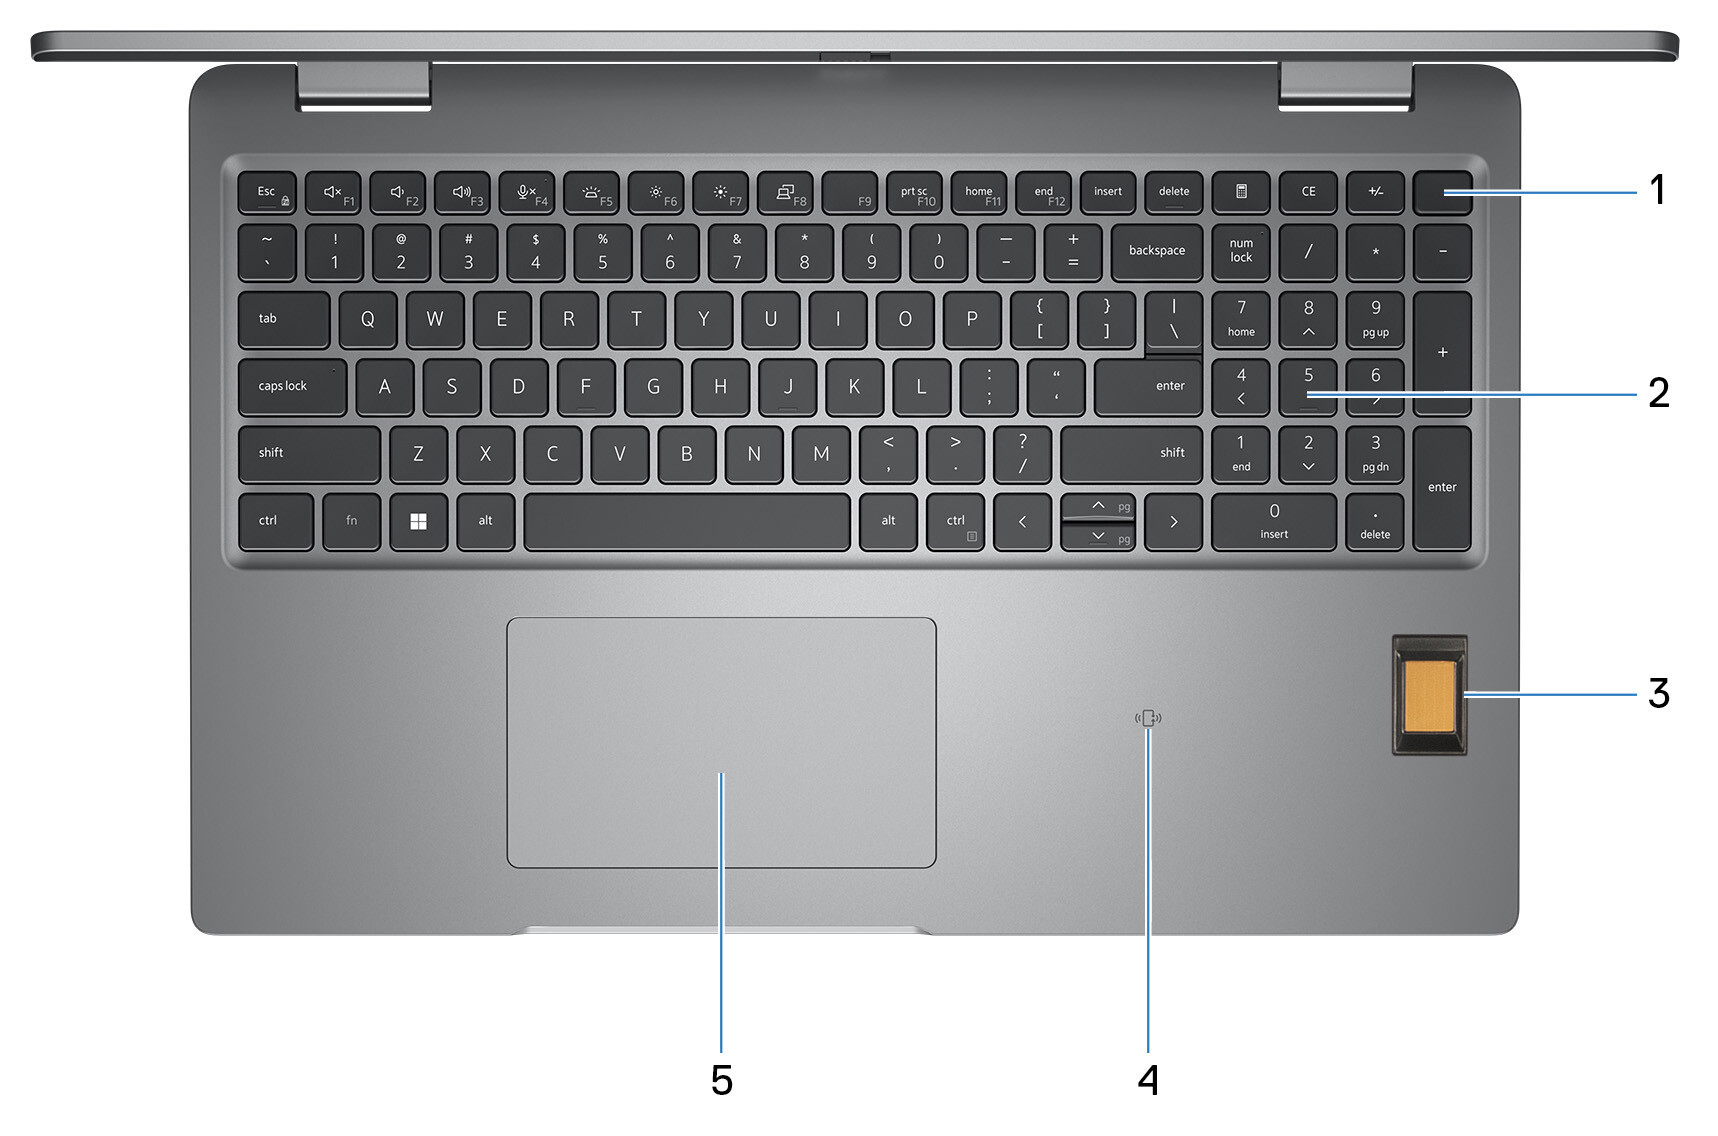
- Power button with optional fingerprint reader
Press to turn on the computer if it is turned off, in sleep state, or in hibernate state.
When the computer is turned on, press the power button to put the computer into sleep state; press and hold the power button for 10 seconds to force shut-down the computer.
If the power button has a fingerprint reader, place your finger on the power button steadily to log in. - Keyboard
- Fingerprint reader (optional)
Press your finger on the fingerprint reader to log in to your computer. The fingerprint reader enables your computer to recognize your fingerprints as a password. - NFC/Contactless smart card reader (optional)
Provides contactless access of cards in corporate networks. - Touchpad
Move your finger on the touchpad to move the mouse pointer. Tap to left-click and two fingers tap to right-click.
Left
Right

- Thunderbolt 4.0 port with Power Delivery and DisplayPort
Supports USB4, DisplayPort 1.4, Thunderbolt 4 and also enables you to connect to an external display using a display adapter. Supports data transfer rates of up to 40 Gbps for USB4 and Thunderbolt 4. - Thunderbolt 4.0 port with Power Delivery and DisplayPort
Supports USB4, DisplayPort 1.4, Thunderbolt 4 and also enables you to connect to an external display using a display adapter. Supports data transfer rates of up to 40 Gbps for USB4 and Thunderbolt 4. - Battery-status light
Indicates the battery-charge status.
Solid yellow—Battery charge is low.
Blinking yellow—Battery charge is critical. - Smart-card reader slot (optional)

- microSD-card slot
Reads from and writes to the microSD-card. - Universal audio jack
Connect headphones or a headset (headphone and microphone combo). - USB 3.2 Gen 1 port
Connect devices such as external storage devices and printers. Provides data transfer speeds up to 5 Gbps. - USB 3.2 Gen 1 port with PowerShare
Connect devices such as external storage devices and printers.
Provides data transfer speeds up to 5 Gbps. PowerShare enables you to charge your USB devices even when your computer is turned off. - HDMI 2.0 port
Connect to a TV, external display or another HDMI-in enabled device. Provides video and audio output. - Network port
Connect an Ethernet (RJ-45) cable from a router or a broadband modem for network or Internet access, with a transfer rate of 10/100/1000 Mbps. - Security-cable slot (wedge-shaped)
Connect a security cable to prevent unauthorized movement of your computer.
Data Issues
Call T-Mobile Support (844) 341-4834
Hardware Issues
Contact its.resources@wichita.edu or call (316) 978-3616
General IT-Related Issues
Visit Wichita.edu/helpdesk
Front
Top
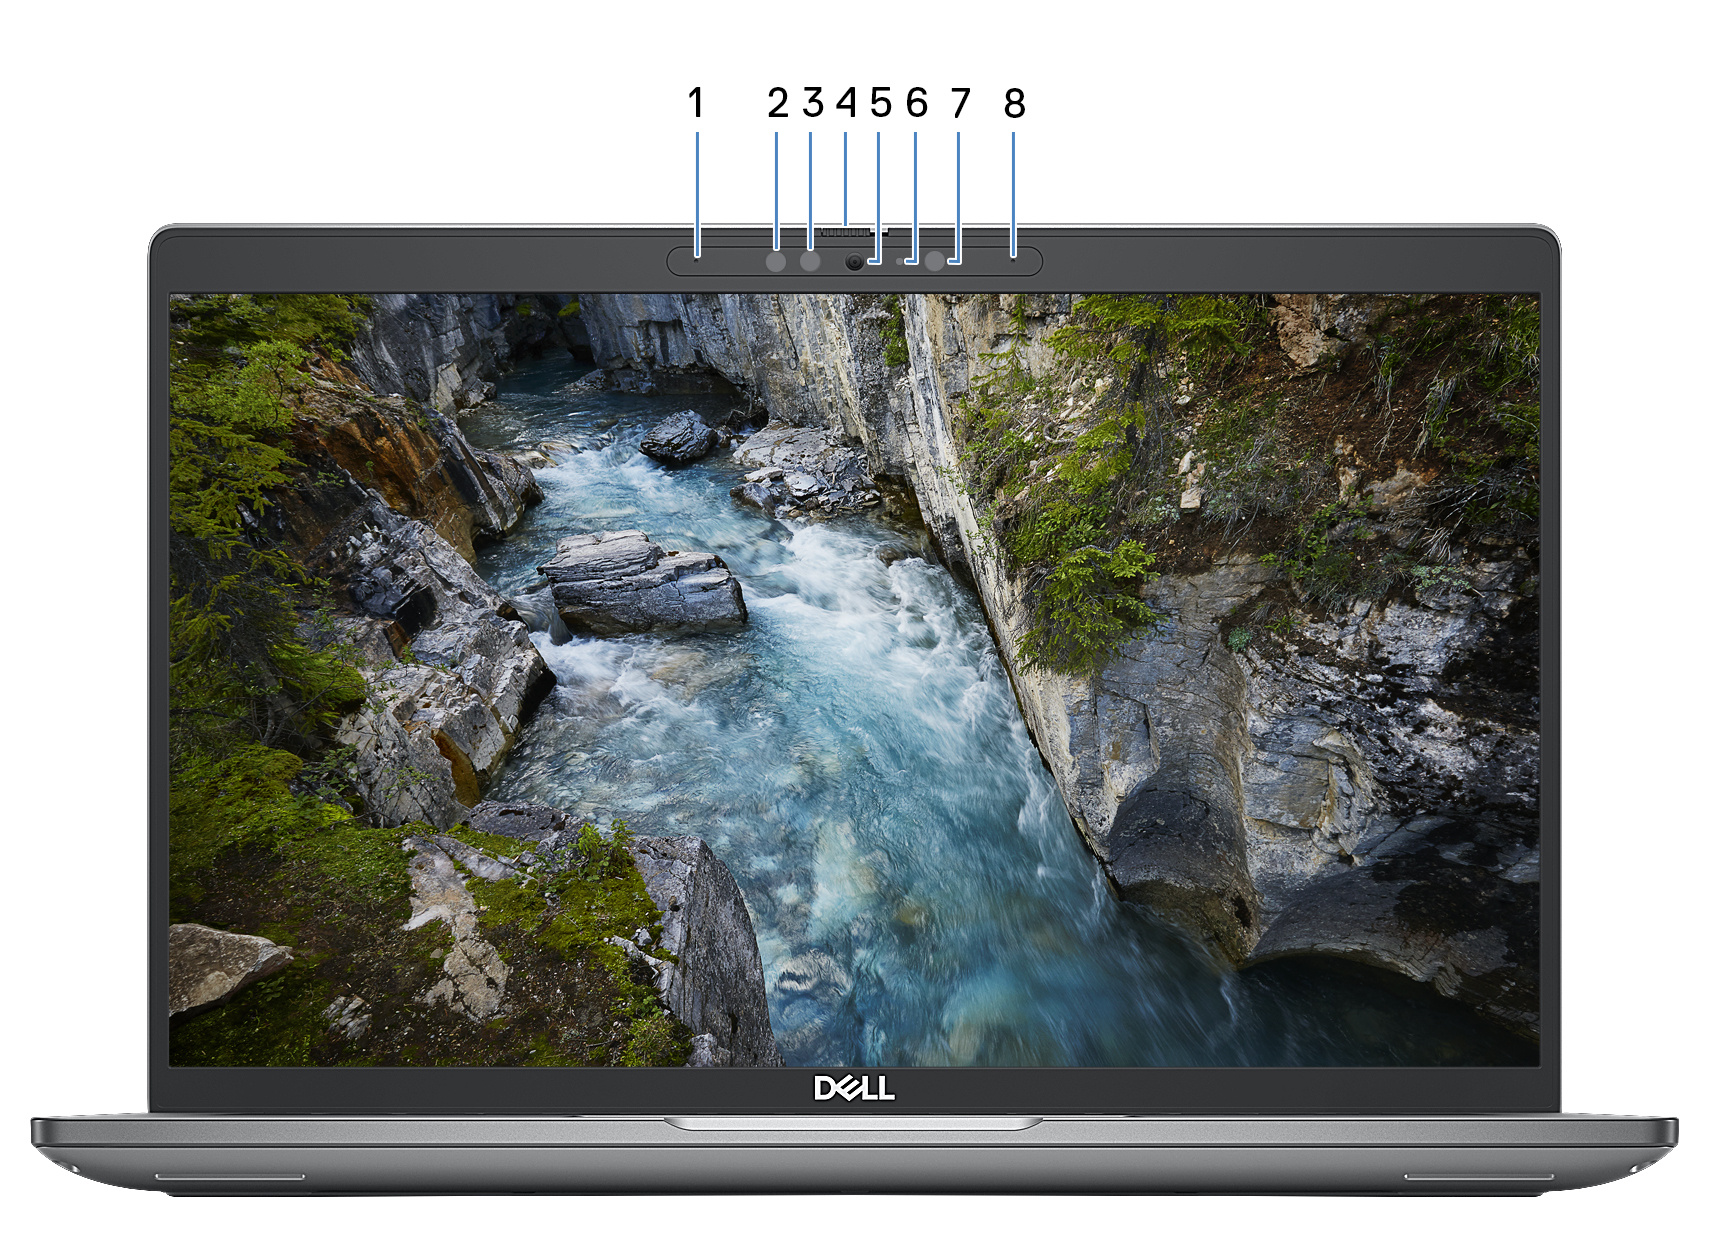
- Left microphone
Provides digital sound input for audio recording and voice calls. - Infrared emitter (optional)
The infrared emitter emits infrared light, which enables the infrared camera to sense and track motion. - Infrared camera (optional)
Enhances security when paired with Windows Hello face authentication. - Camera shutter
Slide the privacy shutter to the left to access the camera lens. - Camera
A camera enables you to video chat, capture photos, and record videos. - Camera-status light
Turns on when the camera is in use. - Ambient-light sensor (optional)
The sensor detects the ambient light and automatically adjusts the display brightness. - Right microphone
Provides digital sound input for audio recording and voice calls.
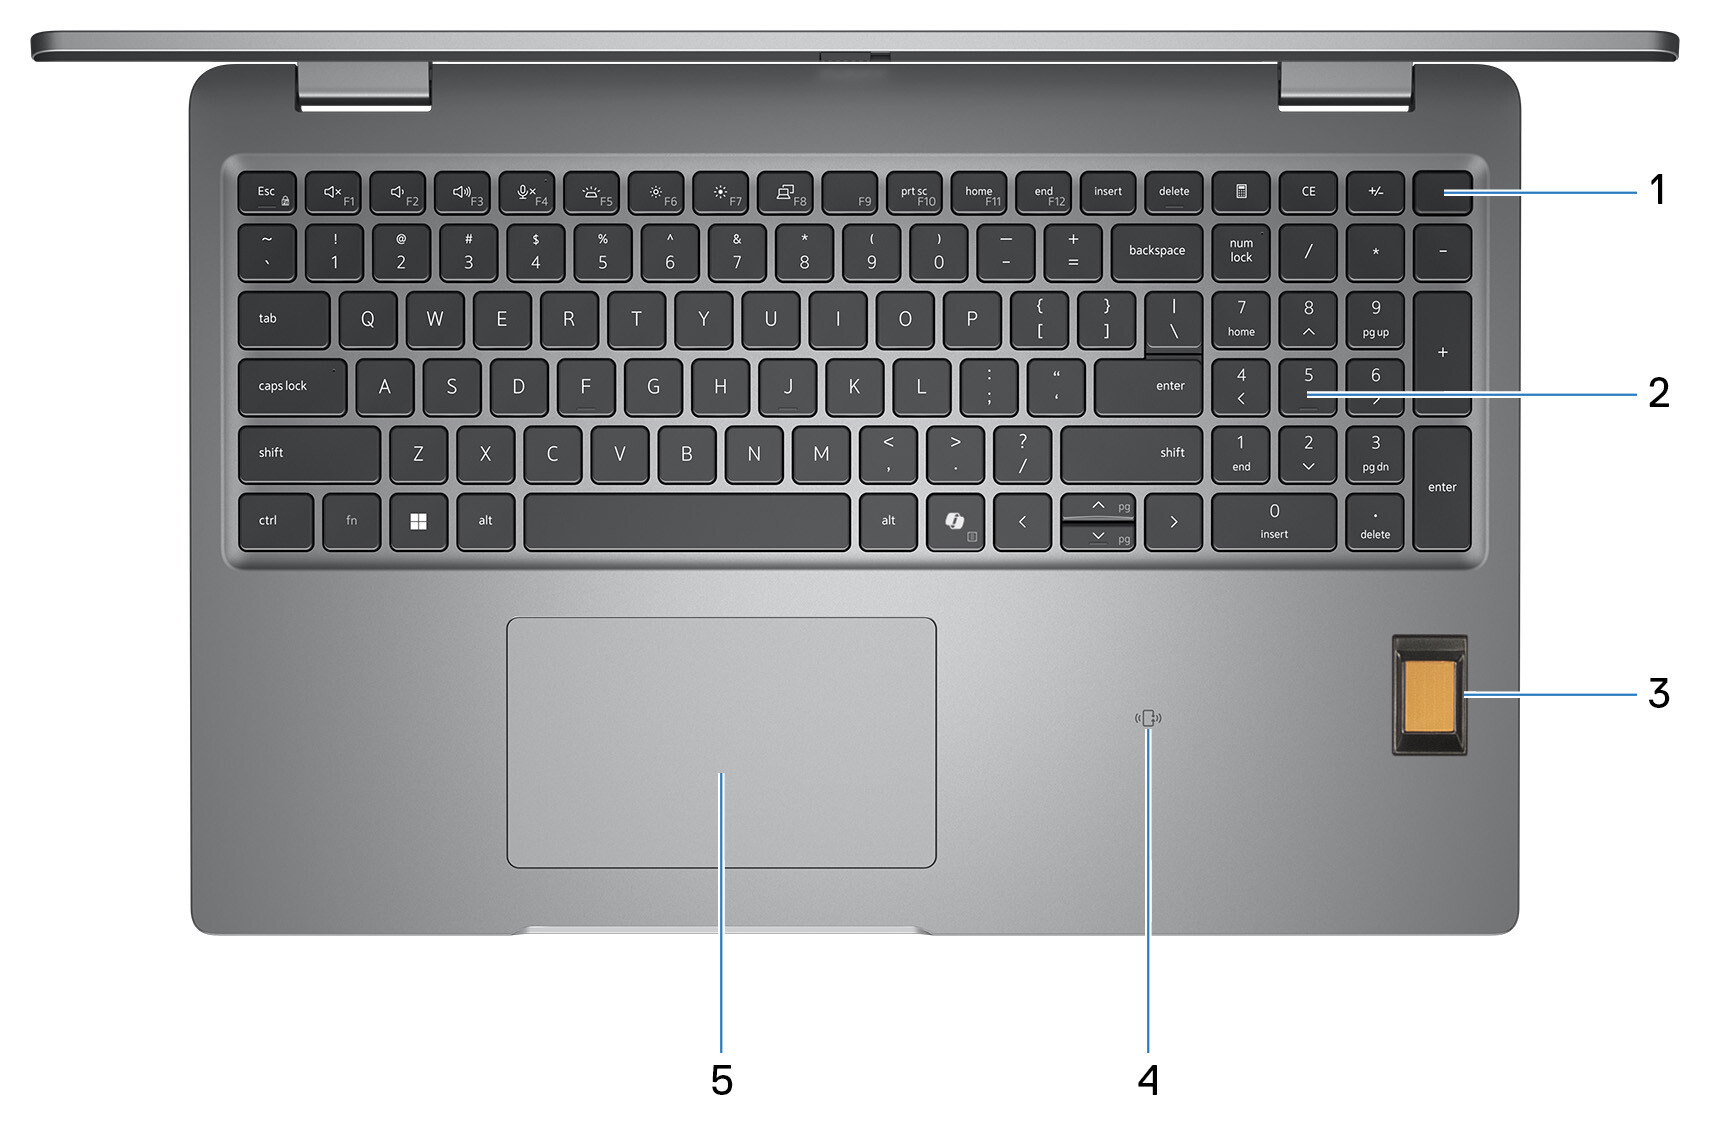
- Power button with optional fingerprint reader
Press to turn on the computer if it is turned off, in sleep state, or in hibernate state.
When the computer is turned on, press the power button to put the computer into sleep state; press and hold the power button for 10 s to force shut-down the computer.
If the power button has a fingerprint reader, place your finger on the power button steadily to log in. - Keyboard
Use the keyboard to input characters and functions into your computer. - Fingerprint reader (optional)
Press your finger on the fingerprint reader to log in to your computer. The fingerprint reader enables your computer to recognize your fingerprints as a password. - NFC or Contactless smart card reader (optional)
NFC or Contactless smart card reader provides contactless access of cards in corporate networks. - Touchpad
Move your finger on the touchpad to move the mouse pointer. Tap to left-click and two fingers tap to right-click.
Left
Right

- Thunderbolt 4.0 with DisplayPort Alt Mode/USB Type-C/Power Delivery
Supports USB4, DisplayPort 1.4, Thunderbolt 4 and also enables you to connect to an external display using a display adapter. Provides data transfer rates of up to 40 Gbps for USB4 and Thunderbolt 4. - Thunderbolt 4.0 with DisplayPort Alt Mode/USB Type-C/USB4/Power Delivery
Supports USB4, DisplayPort 1.4, Thunderbolt 4 and also enables you to connect to an external display using a display adapter. Provides data transfer rates of up to 40 Gbps for USB4 and Thunderbolt 4. - Battery-status light
Battery-status light indicates the battery-charge status.
White-Battery is charging.
Solid yellow-Battery charge is low.
Blinking yellow-Battery charge is critical.
Off—Battery is fully charged. - Smart-card reader slot (optional)
Using smart card provides authentication in corporate networks.

- microSD-card slot
Reads from and writes to the microSD-card. - Universal audio jack
Connect headphones or a headset (headphone and microphone combo). - USB 3.2 Gen 1 port
Connect devices such as external storage devices and printers. It provides data transfer speeds up to 5 Gbps. - 3.2 Gen 1 port with PowerShare
Connect devices such as external storage devices and printers.
It provides data transfer speeds up to 5 Gbps. PowerShare enables you to charge your USB devices even when your computer is turned off. - HDMI 2.1 TMDS port
Connect to a TV, external display, or another HDMI-in enabled device. Provides video and audio output. - Network port
Connect an Ethernet (RJ45) cable from a router or a broadband modem for network or Internet access, with a transfer rate of 10/100/1000 Mbps. - Security-cable slot (wedge-shaped)
Connect a security cable to prevent unauthorized movement of your computer.
Data Issues
Call T-Mobile Support (844) 341-4834
Hardware Issues
Contact its.resources@wichita.edu or call (316) 978-3616
General IT-Related Issues
Visit Wichita.edu/helpdesk
POWERED BY T-MOBILE 5G![]()


